用 Flutter 與 KKBOX API 做出科科歌單
前言
大家好,我是 KKBOX 開放平台部門的小小實習生 Raymond,今天想分享一下自己學習 Flutter 並使用 KKBOX Open API 做出一個簡單的 App 的心路歷程,這篇文章首先會簡單的介紹一下 Flutter,我取得 Flutter 資源的方式,再來就是實作 KKBOX 報報的部分以及學習感想,希望能讓大家有所收穫。
Flutter 是什麼?
Flutter 是由 Google 所開發出的跨平台開發套件,可同時運行於 iOS 與 Android,跨平台,高效能(跟 React Native 比起來),以及開發效率極高的特性讓許多人一試成主顧。在 StackOverflow Developer Survey 2019 的調查結果中,Flutter 是 Most Loved Other Frameworks, Libraries, and Tools 中的第三名,甚至高於 React Native,而 Flutter team 在今年的 Google I/O 大會上釋出了 Flutter for web 的 technical preview,未來也將會支援 Desktop 與 Embedding system,可以說是極具發展潛力的開發套件。
Flutter 的哪些特點吸引了我?
為何 Flutter 如此受歡迎,大家都一用就愛上它?他與同是跨平台開發的 React Native 有什麼不一樣?經過了一番搜尋與研究,我整理出了一些大家喜愛的點(在等下的實作中你也會體驗到)
- 快速的開發:寫過 Android 就知道 Gradle build 會花上很多時間,而在開發時我們常常需要重複的 build 而拖慢開發速度,Flutter 的 hot reload 只要在一開始啟動時進行一次 Gradle build,之後的任何對程式碼的更改只要按下 Ctrl + S,Flutter 就會自動進行 UI 的重構,讓你可以快速的檢視所做的改變,跟 Android 原生開發比其來真的是天壤之別。
- Layout 與邏輯使用同一種語言:不像 Android 使用分別的 XML 檔來設計 Layout,Flutter 使用同一種語言(Dart)來設計 Layout 與邏輯。
- 真.跨平台:相比於同是跨平台的 React Native 使用的是原生平台元件,Flutter 不使用原生平台元件而使用自己的元件(叫做 Widget),因此 Flutter 可以真正做到在任何平台都長得一樣得 UI,且 Flutter 所提供的 Widget 都非常的漂亮、有很高的擴充性與可以高度客製化。
- 效能:因為使用自己的 Widget,Flutter 不需要與原生平台上的元件溝通,只需要一張可以畫畫的 Canvas,因此比起 React Native 在效能上會有較好的表現,尤其是動畫或是使用者做出手勢時,Flutter 可以達到 60fps 的表現。
關於其他 Flutter 的特色,我推薦這一篇 What’s Revolutionary about Flutter,裡面很深入的探討了 Flutter 為何如此讓人興奮,以及 Flutter 使用 Dart 的好處。
如果以上這些引起了你的興趣,接下來我將會分享我如何使用 Flutter 串接 KKBOX Open API 豐富的歌曲資源來做出一個簡單卻漂亮的科科歌單 App,將 KKBOX 的各式歌單與排行榜展示出來。

如果想要動手玩玩看,我把它上架到 Google Play Store 了。
學習的資源
以下是我學習 Flutter 時走過的資源,大家可以當作參考
Flutter官方文件— 不得不說 Flutter 的官方 tutorial 與 doc 真的寫得詳細易懂。
Flutter for Android developer— 如果你學過 Android,這篇文章可以讓你快速上手。
A tour of Dart language— 有學過物件導向語言的話 Dart 應該是蠻好上手的。
Flutter Youtube 頻道— 官方開辦的頻道,我有兩個推薦的清單,一個是 Flutter widget of the week,一個是 Flutter in Focus。
不過 先讓我們來聊聊 KKBOX Open API
KKBOX Open API 是快速整合 KKBOX 平台的高品質音樂資料的主要管道,您可利用各種程式語言透過 HTTP API 取得歌手、專輯、歌曲、排行榜等資訊,方便實作音樂應用於網頁、Mobile App 之中。
— KKBOX developer site
簡單來說,KKBOX 提供了許多歌曲資訊讓大家取用,而運用這些豐富的歌曲資源,我們就可以做出許多有趣的應用,例如 KUBE 酷播歌單,使用 KKBOX 的歌單資源並可以選擇使用 KKBOX、Spotify 或是 Youtube 播放,讓你永遠不會有缺歌期。
除此之外,也有像是 Line Bot 放音樂或是智慧音箱使用語音控制的應用,如果你對如何運用 KKBOX 開放平台的應用有了興趣,或是想知道更多它有趣的應用,可以到 KKBOX developer site 的 API doc 逛逛,或許你會發現一些意想不到的靈感!
製作科科歌單
事前準備
- 如果你還沒在 KKBOX developer site 註冊並新增 App,快去註冊一個吧。
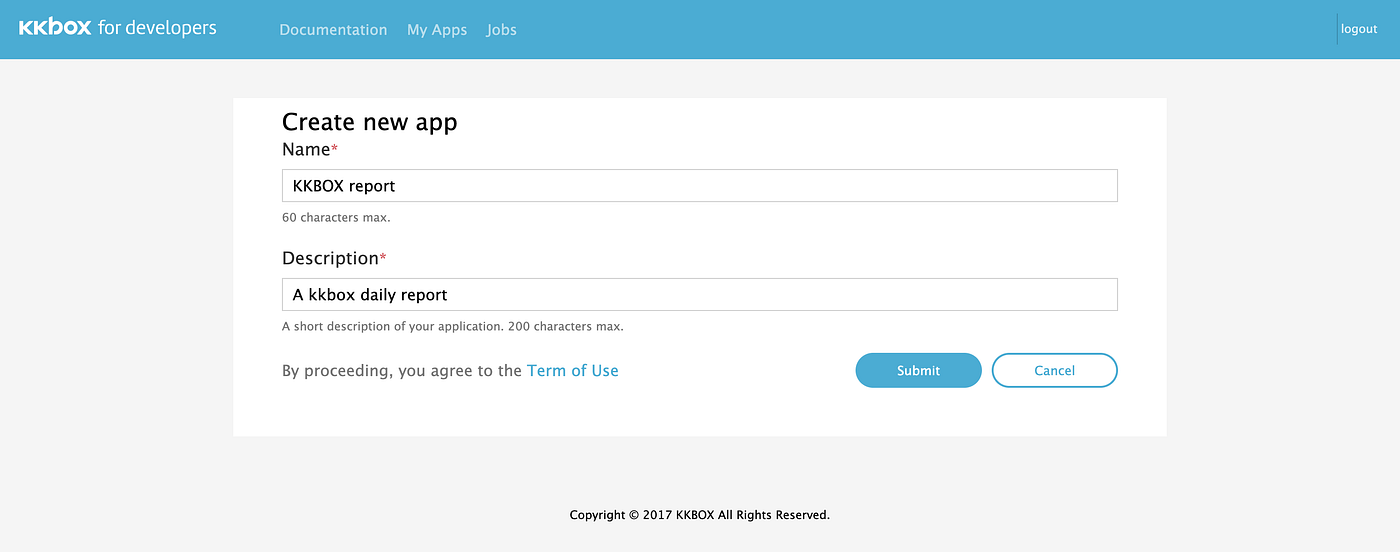
到 KKBOX for developers 註冊後點擊 my apps -> create new app 並填上你的 app 資料

創建完成後,將你的 ID 與 Secret 記錄下來,之後在向 Open API 要資料時會使用到
- 確認你安裝好了 Android Studio, Flutter SDK 與 Flutter plugin for android studio(你也可以使用 VS code),如果你還沒安裝,這份官方文件有著詳盡的安裝步驟,安裝完成後可以在 terminal 輸入
flutter doctor確認安裝完成。

確認第 1,2,5 項都有勾勾
- 這篇文章假設你至少完成了 Flutter 官方的 Get started tutorial,並且知道什麼是 Web API。
先從 Dependency 開始
打開 <project dir>/pubspec.yaml,在 dependencies 下方加入 http 與 url_launcher 兩個套件。http 是用於向 Web API 抓取資料的套件,url_launcher 則是用於開啟歌單連結的套件。
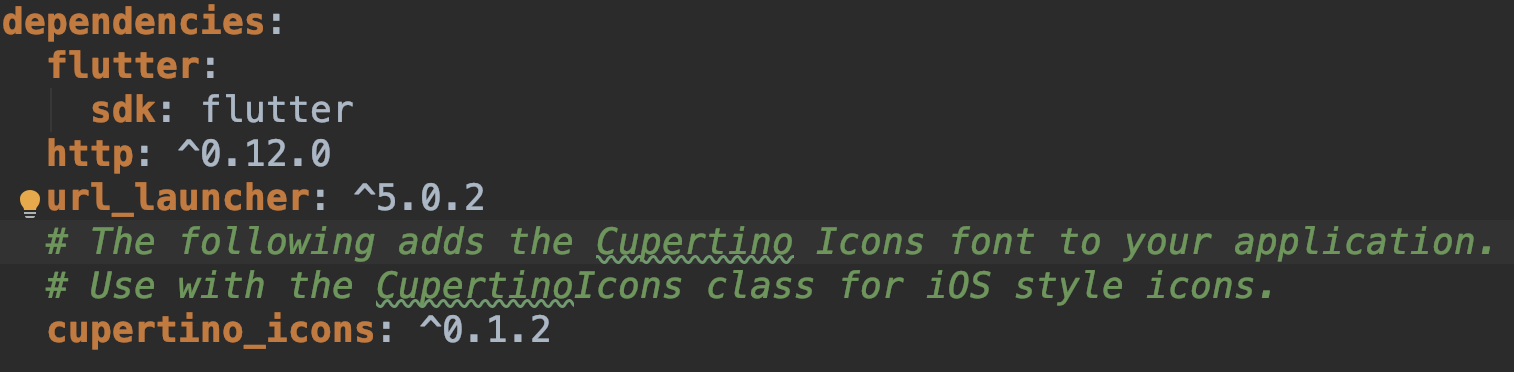
確認 http 與 url_launcher 已經加入了 dependencies 內
從 KKBOX Open API 抓取資料
使用 Dart http 套件
Dart team 提供了非常方便的 http 套件,讓我們能輕鬆地從網路抓取資料,下面是一個簡單的 Get 與 Post 的程式碼。
import 'package:http/http.dart' as http;
Future<http.Response> fetchGet()async {
  String url = 'http://....';
  Map<String,String> headers{
    'Header-name':'header-content'
  };
  return await http.get(url,headers);
}

Future<http.Response> fetchPost()async {
  String url = 'http://....';
  Map<String,String> headers{
    'Header-name':'header-content'
  };
  Map<String,String> body{
    'body-name':'body-content'
  };
  return await http.post(url,headers,body);
}
fetchGet 與 fetchPost 傳回一個 Future<Response> 物件,Future 物件是 Dart 內建的物件,用於表示預期未來才會出現的值,像是 Response 就是要等到 server 方做出了回覆才會拿到獲得的物件。
async 與 await 是兩個 Dart 的關鍵字,這兩個方便的關鍵字讓我們用看起來同步的方式寫非同步的method,避免了可怕的 callback hell 。
KKBOX client credential flow
想要從 KKBOX Open API 獲取資料,需要先透過 client credential flow 取得 access token,可以將 access token 想成 server 給予你的臨時識別證。我們使用之前記錄下來的 ID 與 Secret 來向 Token API 索取 access token,如果 ID 與 Secret 都正確,API 會回覆以下三個欄位,記得將取得的 access token 儲存起來。
{
  "access_token": "fCVTwABPlcO6Qxc7Ll23rsdsf", //用來獲取其他API的資料
  "expires_in": 1492982700,                    //access_token過期時間
  "token_type": "Bearer"
}
getAccessToken() async {
    Static const String credentialFLowUrl = 'https://account.kkbox.com/oauth2/token';
    Map<String,String> requestBody = {
      'grant_type':'client_credentials',
      'client_id':YOUR_CLIENT_ID,
      'client_secret':YOUR_CLIENT_SECRET
    };
    Map<String,String> header = {
      'Content-type':'application/x-www-form-urlencoded'
    };
    final response = await http.post(credentialFlowUrl, headers:header, body:requestBody);
    return json.decode(response.body)['access_token'];
  }
使用 Access Token 向 Open API 抓取特色歌單
有了 token 後,就可以開始使用 KKBOX Open API 的資料,方法是在每個 HTTP request 的 header 中放入 Authorization: Bearer my_access_token 這個欄位,我們以 featured playlists 這個 endpoint 為例:
getFeaturedPlaylists()async{
  String endpoint = 'https://api.kkbox.com/v1.1/featured-playlists?territory=TW'
  Map<String,String> headers = {'Authorization':'Bearer '+ await getAccessToken()};
  var response = await http.get(endPoint,headers);
  print(response.body);
}
以下是 response body:
{
  "data": [
    {
      "id": "Wt95My35CqR9hB_FW1",
      "title": "一起複習少女時代的十年輝煌時刻!",
      "description": "2007年8月,少女時代以同名專輯於韓國出道,可人的少女形象深入人心,十年來靠著努力與實力獲得人氣,也在樂壇創造不少紀錄,膾炙人口的歌曲更是不計其數。",
      "url": "https://event.kkbox.com/content/playlist/Wt95My35CqR9hB_FW1",
      "images": [
        {
          "height": 300,
          "width": 300,
          "url": "https://i.kfs.io/playlist/global/11264817v2/cropresize/300x300.jpg"
        },
        {
          "height": 600,
          "width": 600,
          "url": "https://i.kfs.io/playlist/global/11264817v2/cropresize/600x600.jpg"
        },
        {
          "height": 1000,
          "width": 1000,
          "url": "https://i.kfs.io/playlist/global/11264817v2/cropresize/1000x1000.jpg"
        }
      ],
      "updated_at": "2017-08-01T03:59:31+00:00",
      "owner": {
        "id": "D-gh_8TEudW64tRSCs",
        "name": "KKBOX 韓語小編"
      }
    },
    {
      "//":"省略~"
    }
   ],
  "paging": {
    "offset": 0,
    "limit": 5,
    "previous": null,
    "next": "https://api.kkbox.com/v1.1/featured-playlists?limit=5&territory=TW&offset=5"
  },
  "summary": {
    "total": 30
  }
}
將 Json Response 轉換為專屬 Dart 物件
我們當然可以使用好用的 json.decode(response) 來解析 json 字串,但是當你有個肥大的 json 檔案,將 response 轉化為 dart 內的自訂物件會讓你的人生更加輕鬆。除了自己手動建立 model class,也可以用這個非常好用的轉換工具 quicktype 幫你生成 Class code。自動生成後再做一些命名的微調後就成為我們的 model.dart 拉!
import 'dart:convert';

Playlists playlistsFromJson(String str) => Playlists.fromJson(json.decode(str));

String playlistsToJson(Playlists data) => json.encode(data.toJson());

class Playlists {
  List<Datum> data;
  Paging paging;
  Summary summary;

  Playlists({
    this.data,
    this.paging,
    this.summary,
  });

  factory Playlists.fromJson(Map<String, dynamic> json) => new Playlists(
    data: new List<Datum>.from(json["data"].map((x) => Datum.fromJson(x))),
    paging: Paging.fromJson(json["paging"]),
    summary: Summary.fromJson(json["summary"]),
  );

  Map<String, dynamic> toJson() => {
    "data": new List<dynamic>.from(data.map((x) => x.toJson())),
    "paging": paging.toJson(),
    "summary": summary.toJson(),
  };
}

class Datum {
  String id;
  String title;
  String description;
  String url;
  List<ImageUrl> imageUrls;
  DateTime updatedAt;
  Owner owner;

  Datum({
    this.id,
    this.title,
    this.description,
    this.url,
    this.imageUrls,
    this.updatedAt,
    this.owner,
  });

  factory Datum.fromJson(Map<String, dynamic> json) => new Datum(
    id: json["id"],
    title: json["title"],
    description: json["description"],
    url: json["url"],
    imageUrls: new List<ImageUrl>.from(json["images"].map((x) => ImageUrl.fromJson(x))),
    updatedAt: DateTime.parse(json["updated_at"]),
    owner: Owner.fromJson(json["owner"]),
  );

  Map<String, dynamic> toJson() => {
    "id": id,
    "title": title,
    "description": description,
    "url": url,
    "images": new List<dynamic>.from(imageUrls.map((x) => x.toJson())),
    "updated_at": updatedAt.toIso8601String(),
    "owner": owner.toJson(),
  };
}

class ImageUrl {
  int height;
  int width;
  String url;

  ImageUrl({
    this.height,
    this.width,
    this.url,
  });

  factory ImageUrl.fromJson(Map<String, dynamic> json) => new ImageUrl(
    height: json["height"],
    width: json["width"],
    url: json["url"],
  );

  Map<String, dynamic> toJson() => {
    "height": height,
    "width": width,
    "url": url,
  };
}

class Owner {
  String id;
  String name;

  Owner({
    this.id,
    this.name,
  });

  factory Owner.fromJson(Map<String, dynamic> json) => new Owner(
    id: json["id"],
    name: json["name"],
  );

  Map<String, dynamic> toJson() => {
    "id": id,
    "name": name,
  };
}

class Paging {
  int offset;
  int limit;
  dynamic previous;
  String next;

  Paging({
    this.offset,
    this.limit,
    this.previous,
    this.next,
  });

  factory Paging.fromJson(Map<String, dynamic> json) => new Paging(
    offset: json["offset"],
    limit: json["limit"],
    previous: json["previous"],
    next: json["next"],
  );

  Map<String, dynamic> toJson() => {
    "offset": offset,
    "limit": limit,
    "previous": previous,
    "next": next,
  };
}

class Summary {
  int total;

  Summary({
    this.total,
  });

  factory Summary.fromJson(Map<String, dynamic> json) => new Summary(
    total: json["total"],
  );

  Map<String, dynamic> toJson() => {
    "total": total,
  };
}
現在我們可以輕鬆地使用下面這行程式碼將 JSON response 轉換成 Dart 物件了
playlistsFromJson(response.body)
而我們將與 API 連線的功能包在一個 Class 放進 service.dart 裡:
import 'package:flutter_material/model.dart';
import 'package:http/http.dart' as http;
import 'dart:convert';

class KKBOXOpenAPI{
  static const String oauthTokenUrl='https://account.kkbox.com/oauth2/token';
  static const String openApiBase= 'https://api.kkbox.com/v1.1/';
  String _clientID;
  String _clientSecret;
  String _accessToken;
  KKBOXOpenAPI(String clientID, String clientSecret){
    this._clientID = clientID;
    this._clientSecret = clientSecret;
  }

  Future<Playlists>getFeaturedPlaylist() async{
    String endPoint = openApiBase + 'featured-playlists?territory=TW';
    Map<String,String> headers = {
      'Authorization':'Bearer '+ await _getAccessToken()
    };
    var response = await this._get(endPoint,headers);
    return playlistsFromJson(response.body);
  }

  Future<Playlists> getNewHitsPlaylist() async {
    String endPoint  = openApiBase + 'new-hits-playlists?territory=TW';
    Map<String,String> headers = {
      'Authorization':'Bearer '+ await _getAccessToken()
    };
    var response = await this._get(endPoint, headers);
    return playlistsFromJson(response.body);
  }

  Future<Playlists> getChart() async {
    String endPoint = openApiBase + 'charts?territory=TW';
    Map<String,String> headers = {
      'Authorization':'Bearer '+ await _getAccessToken()
    };
    var response = await this._get(endPoint, headers);
    return playlistsFromJson(response.body);
  }

  _get(url,headers) async{
    final response = await http.get(url,headers: headers);
    return response;
  }

  _post(url,headers,bodyParameters)async{
    final response = await  http.post(url,headers: headers,body: bodyParameters);
    return response;
  }


  _getAccessToken()async {
    if(this._accessToken != null){
      return this._accessToken;
    }
    Map<String,String> requestBody = {
      'grant_type':'client_credentials',
      'client_id':_clientID,
      'client_secret':_clientSecret
    };
    Map<String,String> header = {
      'Content-type':'application/x-www-form-urlencoded'
    };
    final response = await this._post(oauthTokenUrl, header, requestBody);
    this._accessToken = json.decode(response.body)['access_token'];
    return this._accessToken;
  }
}
這樣與 API 連線獲取資料的部分就大功告成拉!
探索 Flutter 的內建 Widget
Flutter 最吸引我的地方就是可以用非常快的速度打造出非常漂亮的 UI,來看看這個 App 所用到的 widget 們。
創建空白 App
我們先在 main.dart 加入以下程式碼來創建一個空白的 App。
import 'package:flutter/material.dart';
import 'package:flutter_material/model.dart';
import 'package:flutter_material/service.dart';
import 'package:url_launcher/url_launcher.dart';
import 'package:flutter/rendering.dart';

void main(){
  runApp(MyApp());
}

class MyApp extends StatelessWidget {
  const MyApp();
  @override
  Widget build(BuildContext context) {
    return MaterialApp(
      theme: ThemeData(
        primarySwatch: Colors.lightBlue,
        buttonColor: Colors.lightBlue,
        buttonTheme: ButtonThemeData(
          textTheme: ButtonTextTheme.primary,
        )
      ),
      home: Home(),
    );
  }
}

class Home extends StatefulWidget {
  @override
  State<StatefulWidget> createState() {
    return _HomeState();
  }

}


class _HomeState extends  State<Home>{

  @override
  Widget build(BuildContext context) {
    return Scaffold();
  }
}
Home 是一個 StatefulWidget ,這代表 Home 的內容會有不同的狀態(不同的 UI),Home 的 createState() 會回傳 _HomeState 這個 State object,裡面有建構 UI 的 build method。我們先讓 build method 回傳一個空的 Scaffold Widget,Scaffod 是一個實作了基本的 material design 的 layout widget(如 bottom navigation bar,app bar,drawer 等等)。
Bottom Navigation
我們用 bottom navigation bar 分出 Open API 的三個 endpoints:Charts、Featured Playlists 與 NewHits Playlists。
//inside _HomeState
  _bodyBuilder(){
    switch(_currentIndex){
      case 0:
        return Center(child: Text("速報新歌"),);
      case 1:
        return Center(child: Text("主題歌單"),);
      case 2:
        return Center(child: Text("排行榜"),);
    }
  }

@override
  Widget build(BuildContext context) {
    return Scaffold(
      appBar: AppBar(
        title: Text(
          "科科歌單",
          style: TextStyle(color: Colors.white),
        ),
      ),
      body: _bodyBuilder(),
      bottomNavigationBar: BottomNavigationBar(
          currentIndex: _currentIndex,
          items: [
            BottomNavigationBarItem(
              icon: new Icon(Icons.whatshot),
              title: new Text("速爆新歌"),
            ),
            BottomNavigationBarItem(
              icon: new Icon(Icons.apps),
              title: new Text("主題歌單",),
            ),
            BottomNavigationBarItem(
              icon: new Icon(Icons.list),
              title: new Text("排行榜")
            )
          ],
        onTap: (int index){
            setState(() { this._currentIndex =index;});
        },
      ),
    );
  }
在 Scaffold 中加入 appBar、body、bottomNavigationBar 三個引數,在 BottomNavigationBar 中的 items 參數放入 BottonNavigationBarItem 的 list,list 裡包含了希望出現在 bottom bar 的選項,先將 currentindex 預設為 1,currentindex 告訴 bottom bar 目前所選中的選項是哪一個。我們在 onTap 內實作 bottom bar 切換時進行 setState 讓 widget tree 重新做 build,而 build 時 _bodyBuilder 依據 _currentIndex 回傳不同的 body,完成後的成果如下。

ListView
我們使用 ListView 來將從 API 拿到的資料顯示在 App 上,而 Flutter 內建的 ListView.Builder 讓我們可以輕鬆的製作出獨一無二的 ListView widget。先來看看 Scaffold 內 body 的設置。
//inside Scaffold
body: FutureBuilder<Playlists>(
          future: _bodyBuilder(),
          builder: (context,snapshot){
            if(snapshot.connectionState == ConnectionState.done) {
              this.playlist = snapshot.data;
              return ListView.builder(
                  itemCount: this.playlist.data.length,
                  itemBuilder: _listItemBuilder
              );
            }
            else{
              return Center(
                child: CircularProgressIndicator(),
              );
            }
          }
      ),
body 內放入 FutureBuilder 這個 Widget 會與 future 參數互動並根據 snapshot 的狀態進行 build,在這裡 FutureBuilder 在需要較長時間的 _bodyBuilder() 還未完成前會回傳 CircularProgressIndicator 表示資料還沒準備好,而 _bodyBuilder 完成後所回傳的物件(此例為 Playlists 物件)會放在 snapshot 裡面。
KKBOXOpenAPI kkboxOpenAPI = new KKBOXOpenAPI('YOUR_CLIENT_ID', 'YOUR_CLIENT_SECRET');
Future<Playlists> _bodyBuilder() async{
    switch(_currentIndex){
      case 0:
        return await kkboxOpenAPI.getNewHitsPlaylist();
      case 1:
        return await kkboxOpenAPI.getFeaturedPlaylist();
      case 2:
        return await kkboxOpenAPI.getChart();
    }
  }
完成連線後我們將資料存入 class 內的變數 playlists 內,然後寫一個 _listItemBuilder 製作客製化的 list item。
//inside _HomeState
Widget _listItemBuilder(BuildContext context,int index){
    return Padding(
      padding: const EdgeInsets.only(bottom: 32),
      child: GestureDetector(
        onTap: ()=>
            showDialog(context: context, builder: (context)=>_dialogBuilder(context,index)),
        child: Stack(
          alignment: Alignment.bottomLeft,
          children: <Widget>[
            Image.network(
                this.playlists.data[index].imageUrls[1].url,
                fit:BoxFit.fitWidth,
            ),
            Padding(
              padding: const EdgeInsets.only(left: 8,bottom: 8),
              child: Text(
                  playlists.data[index].title,
                  style: new TextStyle(
                    color:Colors.white ,
                    fontSize: 30,
                    fontWeight: FontWeight.bold,
                    shadows: <Shadow>[
                      Shadow(
                        blurRadius: 3.0,
                        color: Color.fromARGB(255, 0, 0, 0),
                      ),
                    ],
                  ),
                  overflow: TextOverflow.ellipsis,
                ),
            ),
          ],
        ),
      ),
    );
  }
我們的 list item 主要由使用 stack widget 在一張圖片上疊加文字組成,再用 GestureDetector 包起來,而當使用者點擊了 item(onTap),會呼叫 showDialog method 跳出一個詳細資訊的對話方塊。ListItem.Builder 會依據參數 itemCount 來呼叫 _listItemBuilder(context,index),而 _listemItemBuilder 再依據 index 向 playlists 拿取歌單的資料來建造 widget。

Dialog
現在讓我們來完成最後一哩路,製作 _dialogBuilder 。
//inside _HomeState
Widget _dialogBuilder(BuildContext context,int index){
     return SimpleDialog(
       contentPadding: EdgeInsets.zero,
       children: [
         Image.network(
           this.playlists.data[index].imageUrls[1].url,
           fit:BoxFit.fill
         ),
         Padding(
           padding: EdgeInsets.all(16),
           child: Column(
             crossAxisAlignment: CrossAxisAlignment.stretch,
             children: <Widget>[
               Text(
                 this.playlists.data[index].title,
                 style: (Theme.of(context)).textTheme.title,
               ),
               SizedBox(height: 10,),
               Text(this.playlists.data[index].description),
               SizedBox(height: 16,),
               RaisedButton(
                 onPressed: (){
                   _launchUrl(this.playlists.data[index].url);
                 },
                 child: const Text("Listen"),
               )

             ],
           ),
         )

       ],
     );
  }
  _launchUrl(String url) async{
    if(await canLaunch(url)){
      await launch(url);
    }else{
      throw "could not launch $url";
    }
  }
Flutter 除了內建了漂亮的 material design widget,我們也可以很輕鬆地製作客製化 Widget,_dailogBuilder 回傳一個 SimpleDialog,我們在 SimpleDialog 內放入圖片、歌單標題、歌單描述,與一個 Listen 的按鈕,按下之後會打開 KKBOX 的 App 並播放歌單。
以下是最後 main.dart 的內容
import 'package:flutter/material.dart';
import 'package:flutter_material/model.dart';
import 'package:flutter_material/service.dart';
import 'package:url_launcher/url_launcher.dart';
import 'package:flutter/rendering.dart';

void main(){
  debugPaintSizeEnabled = false;
  runApp(MyApp());
}

class MyApp extends StatelessWidget {
  const MyApp();

  @override
  Widget build(BuildContext context) {
    return MaterialApp(
      theme: ThemeData(
        primarySwatch: Colors.lightBlue,
        buttonColor: Colors.lightBlue,
        buttonTheme: ButtonThemeData(
          textTheme: ButtonTextTheme.primary,
        )
      ),
      home: Home(),
    );
  }
}

class Home extends StatefulWidget {
  @override
  State<StatefulWidget> createState() {
    // TODO: implement createState
    return _HomeState();
  }

}


class _HomeState extends  State<Home>{
  int _currentIndex=1;
  Playlists playlists;
  KKBOXOpenAPI kkboxOpenAPI = new KKBOXOpenAPI(
      '5bffb622103056b75181bc1f68cc2bde', 'eb378c8431b314b21b16b1beb4e4e8e8');

  Widget _dialogBuilder(BuildContext context,int index){
     return SimpleDialog(
       contentPadding: EdgeInsets.zero,
       children: [
         Image.network(
           this.playlists.data[index].imageUrls[1].url,
           fit:BoxFit.fill
         ),
         Padding(
           padding: EdgeInsets.all(16),
           child: Column(
             crossAxisAlignment: CrossAxisAlignment.stretch,
             children: <Widget>[
               Text(
                 this.playlists.data[index].title,
                 style: (Theme.of(context)).textTheme.title,
               ),
               SizedBox(height: 10,),
               Text(this.playlists.data[index].description),
               SizedBox(height: 16,),
               RaisedButton(
                 onPressed: (){
                   _launchUrl(this.playlists.data[index].url);
                 },
                 child: const Text("Listen"),
               )

             ],
           ),
         )

       ],
     );
  }
  _launchUrl(String url) async{
    if(await canLaunch(url)){
      await launch(url);
    }else{
      throw "could not launch $url";
    }
  }
  Widget _listItemBuilder(BuildContext context,int index){
    return Padding(
      padding: const EdgeInsets.only(bottom: 32),
      child: GestureDetector(
        onTap: ()=>
            showDialog(context: context, builder: (context)=>_dialogBuilder(context,index)),
        child: Stack(
          alignment: Alignment.bottomLeft,
          children: <Widget>[
            Image.network(
                this.playlists.data[index].imageUrls[1].url,
                fit:BoxFit.fitWidth,
            ),
            Padding(
              padding: const EdgeInsets.only(left: 8,bottom: 8),
              child: Text(
                  playlists.data[index].title,
                  style: new TextStyle(
                    color:Colors.white ,
                    fontSize: 30,
                    fontWeight: FontWeight.bold,
                    shadows: <Shadow>[
                      Shadow(
                        blurRadius: 3.0,
                        color: Color.fromARGB(255, 0, 0, 0),
                      ),
                    ],
                  ),
                  overflow: TextOverflow.ellipsis,
                ),
            ),
          ],
        ),
      ),
    );
  }

  Future<Playlists> _bodyBuilder() async{
    switch(_currentIndex){
      case 0:
        return await kkboxOpenAPI.getNewHitsPlaylist();
        break;
      case 1:
        return await kkboxOpenAPI.getFeaturedPlaylist();
        break;
      case 2:
        return await kkboxOpenAPI.getChart();
        break;
      default:
        return null;
    }
  }

  @override
  Widget build(BuildContext context) {
    return Scaffold(
      appBar: AppBar(
        title: Text(
          "科科歌單",
          style: TextStyle(color: Colors.white),
        ),
      ),
      body: FutureBuilder<Playlists>(
          future: _bodyBuilder(),
          builder: (BuildContext context,AsyncSnapshot<Playlists> snapshot){
            if(snapshot.connectionState == ConnectionState.done) {
              this.playlists = snapshot.data;
              return ListView.builder(
                  itemCount: this.playlists.data.length,
                  itemBuilder: _listItemBuilder
              );
            }
            else{
              return Center(
                child: CircularProgressIndicator(),
              );
            }
          }
      ),
      bottomNavigationBar: BottomNavigationBar(
          currentIndex: _currentIndex,
          items: [
            BottomNavigationBarItem(
              icon: new Icon(Icons.whatshot),
              title: new Text("速爆新歌"),
            ),
            BottomNavigationBarItem(
              icon: new Icon(Icons.apps),
              title: new Text("主題歌單",),
            ),
            BottomNavigationBarItem(
              icon: new Icon(Icons.list),
              title: new Text("排行榜")
            )
          ],
        onTap: (int index){
            setState(() {
              this._currentIndex =index;
            });
        },
      ),
    );
  }
}
大功告成,完成了一個簡單小巧的 Flutter App,如果你需要完整的程式碼,我把它放在了 Github 上了。
結語
幾天下來學習 Flutter 就會感覺出為何它如此受大家愛戴了,豐富而且好看的 Widget、Ctrl+S 就會將改變顯示出來的 hot reload 還有好上手卻強大的 Dart 語言(尤其是 async/await),寫起來會讓人很開心。而除了特色歌單之外,KKBOX 的開放平台也提供了歌曲搜尋,歌曲電台等其他資源,如果有什麼 Idea,只要有一個開發者帳號就可以用任何程式語言開始打造你的 App 了,希望大家看在實習生的份上多多參觀(鞠躬),謝謝大家。
留言
Read more: https://eiliana.com/blogitem/what-you-should-know-to-get-affordable-website-design-and-development-services