打造具備 NLP 功能的 Telegram Bot(上)
最近因為一些契機學了 Python 3,用它做了一個 Telegram Bot(GitHub 連結),裡面用到 NLP Service,用上下兩篇文章記錄一下實作過程還有眉角。上篇首先教大家如何做一個最基本的回聲 Chatbot,接下來我們可以透過 NLP 服務,讓 Chatbot 根據使用者不同的訊息做回答,這樣就變成更加人性化的聊天機器人囉!使用的工具及服務:
Step 1. Creating new bot
Telegram 很有趣的地方在於,與其他通訊軟體(Line、Messenger)相比,開發者管理 Bot 的方式也是透過官方提供的一位 Bot 在處理的,它叫做 BotFather(眾 Bot 之父 XD)。如果已經有 Telegram 帳號,只要加 BotFather 為好友,就可以開始管理你的 Bot。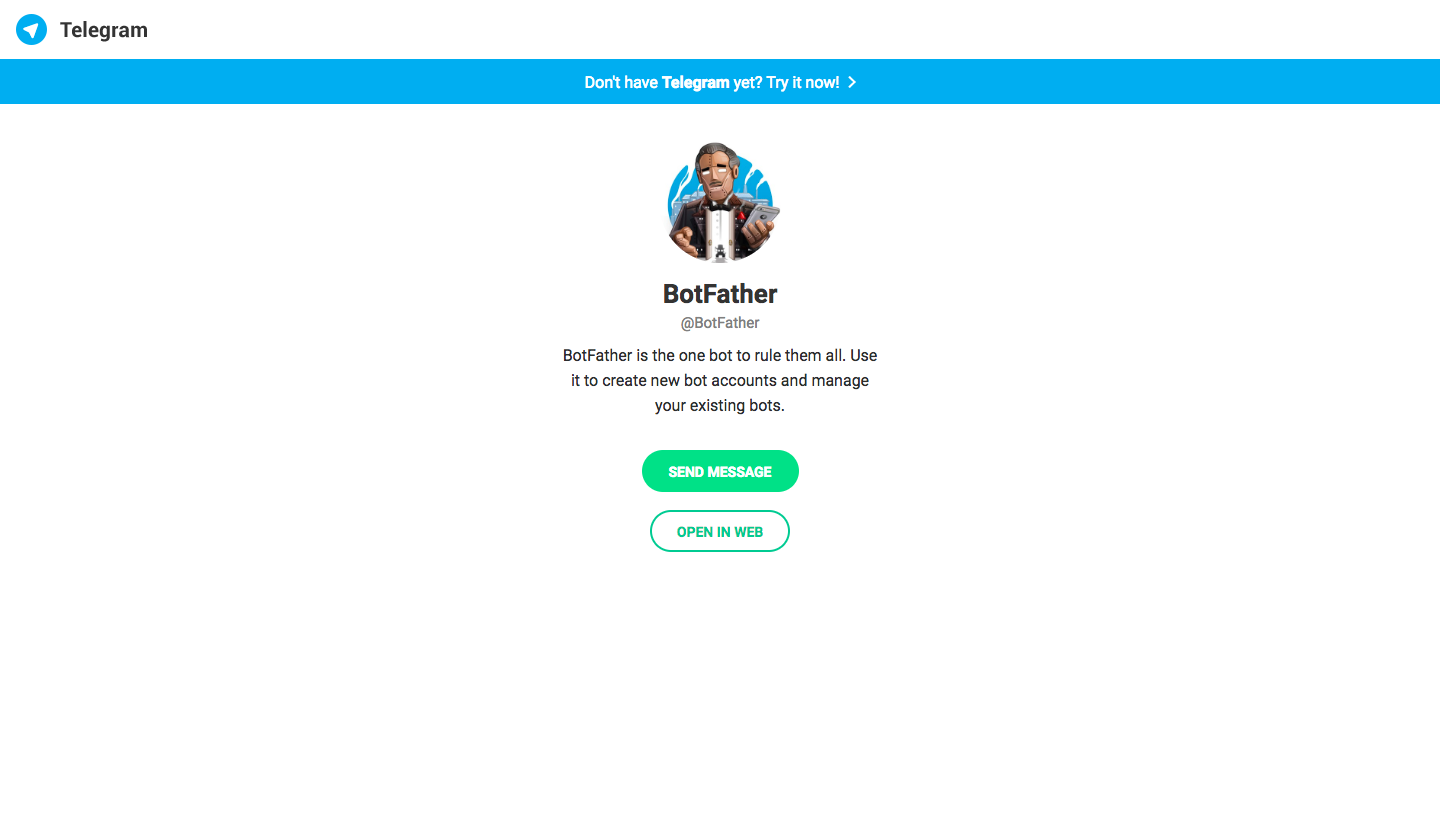
加入 BotFather 好友後,它會親切地問候,並告訴你他能為你提供什麼服務。
I can help you create and manage Telegram bots. If you're new to the Bot API, please see the manual ([https://core.telegram.org/bots](https://core.telegram.org/bots)).

You can control me by sending these commands:

/newbot - create a new bot
/mybots - edit your bots [beta]
/mygames - edit your games ([https://core.telegram.org/bots/games](https://core.telegram.org/bots/games)) [beta]

Edit Bots
/setname - change a bot's name
/setdescription - change bot description
/setabouttext - change bot about info
/setuserpic - change bot profile photo
/setcommands - change the list of commands
/deletebot - delete a bot

Bot Settings
/token - generate authorization token
/revoke - revoke bot access token
/setinline - toggle inline mode ([https://core.telegram.org/bots/inline](https://core.telegram.org/bots/inline))
/setinlinegeo - toggle inline location requests ([https://core.telegram.org/bots/inline#location-based-results](https://core.telegram.org/bots/inline#location-based-results))
/setinlinefeedback - change inline feedback ([https://core.telegram.org/bots/inline#collecting-feedback](https://core.telegram.org/bots/inline#collecting-feedback)) settings
/setjoingroups - can your bot be added to groups?
/setprivacy - toggle privacy mode ([https://core.telegram.org/bots#privacy-mode](https://core.telegram.org/bots#privacy-mode)) in groups

Games
/newgame - create a new game ([https://core.telegram.org/bots/games](https://core.telegram.org/bots/games))
/listgames - get a list of your games
/editgame - edit a game
/deletegame - delete an existing game/new bot 指令,接著輸入 Chatbot name 及 username,最後就會得到Done! Congratulations on your new bot. You will find it at t.me/chatbot_workshop_bot. You can now add a description, about section and profile picture for your bot, see /help for a list of commands. By the way, when you've finished creating your cool bot, ping our Bot Support if you want a better username for it. Just make sure the bot is fully operational before you do this.
Use this token to access the HTTP API:
606248605:AAGv_TOJdNNMc_v3toHK_X6M-dev_1tG-JA
For a description of the Bot API, see this page: [https://core.telegram.org/bots/api](https://core.telegram.org/bots/api)606248605:AAGv_TOJdNNMc_v3toHK_X6M-dev_1tG-JA 則是 token,用來 access Telegram Bot API。請勿外洩,否則他人就可以擷取使用者傳給 Bot 的訊息,然後幫你回覆。Step 2. Understanding chatbot’s architecture
/new bot 結束後,得到自己的 Bot 與 token。就可以開始和 Bot 對話(雖然它還不會回答)。講幾句話以後,透過瀏覽器進入以下連結https://api.telegram.org/bot{$token}/getUpdates
$token 換成在 Step 1 拿到的 token,例如:
https://api.telegram.org/bot606248605:AAGvTOJdNNMcv3toHKX6M-dev1tG-JA/getUpdates
就會在瀏覽器上看到自己和 Chatbot 的對話紀錄
{
  ok: **true**,
  result: [
    {
      update_id: 140863081,
      message: {
        message_id: 2,
        from: {
          id: 338083968,
          is_bot: **false**,
          first_name: "zaoldyeck",
          username: "zaoldyeck9970",
          language_code: "zh-Hant-TW"
        },
        chat: {
          id: 338083968,
          first_name: "zaoldyeck",
          username: "zaoldyeck9970",
          type: "private"
        },
        date: 1527754411,
        text: "Hello"
      }
    }
  ]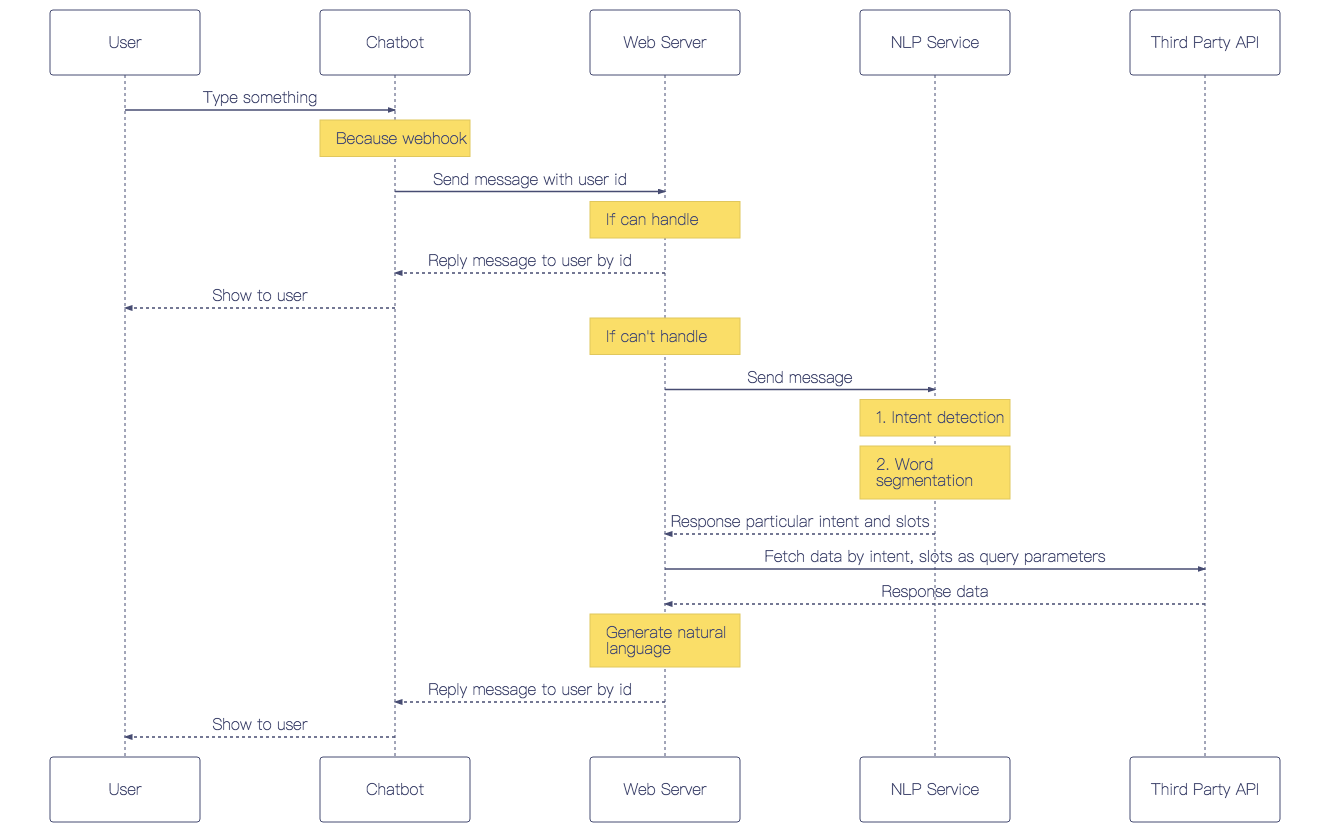
}取得使用者訊息的兩種方法-Long Polling vs Webhook
- Long Polling 是指程式間隔一定時間透過 getUpdates(上面所使用的方法)取得訊息,缺點是浪費資源、不夠即時,所以適合在程式還沒有 deploy,在 develop 和 test 階段時使用。
- Webhook 是指向 Telegram 設定一組 callback url,只要當使用者傳送訊息給 Chatbot,Telegram 就會把用息連同 metada 透過 url 傳給 web server。適合在程式已經 deploy,有固定 url 的 production 環境使用。
Step 3. Prepare development environment
先建立一個專案目錄$ mkdir $project_name$ cd $project_name$ pipenv install --three python-telegram-bot flask gunicorn requests參數及 module 說明安裝完後,專案目錄中會增加兩個檔案
--three用 Python 3 建立虛擬環境
python-telegram-botTelegram Bot API wrapper.
flaskWeb framework. Using for building webhook API.
gunicornPython WSGI HTTP server for UNIX. Using for deploying web server.
requestsHTTP client library.
Project Directory
├── Pipfile.lock
└── PipfilePipfile[packages] python-telegram-bot = "" flask = "" gunicorn = "" requests = ""
[dev-packages]
[requires] python_version = "3.6"
接著,在專案目錄中新增一個 config file,把 Chatbot 所用到 Service 的 key 及 secret 都寫在 config file 中。這麼做的優點如下:
- service key 及 secret 不應該寫在程式碼裡,避免因為有做版本控制,在 git commit & push 後將機密資訊暴露在 public repository
- 集中管理,日後若需要更改 key,直接編輯 config file 即可,不用更動程式碼,也能確保程式中有用到 key 及 secret 的模組都會同步更新
- 部署專案時,比起在 server 設定環境變數,loading config file 的方式會更加方便容易
在專案目錄中新增
config.ini 檔案$ touch config.iniini
[TELEGRAM]
ACCESS_TOKEN =
WEBHOOK_URL =
使用時,把各 service 申請到的
token / key / secret 放在 = 後面即可,例如:[TELEGRAM]
ACCESS_TOKEN = 606248605:AAGv_TOJdNNMc_v3toHK_X6M-dev_1tG-JAProject Directory
├── config.ini
├── Pipfile.lock
└── PipfileStep 4. Develop first echo chatbot
這一步會先完成一個鸚鵡回話 Chatbot,講解 python-telegram-bot 提供哪些模組幫助我們做 Telegram Bot 開發。在專案目錄中,新增
main.py 檔案$ touch main.pyimport telegram from flask import Flask, request from telegram.ext import Dispatcher, MessageHandler, Filters
Load data from config.ini file
config = configparser.ConfigParser() config.read('config.ini')Enable logging
logging.basicConfig(format='%(asctime)s - %(name)s - %(levelname)s - %(message)s', level=logging.INFO) logger = logging.getLogger(name)Initial Flask app
app = Flask(name)Initial bot by Telegram access token
bot = telegram.Bot(token=(config['TELEGRAM']['ACCESS_TOKEN']))@app.route('/hook', methods=['POST']) def webhookhandler(): """Set route /hook with POST method will trigger this method.""" if request.method == "POST": update = telegram.Update.dejson(request.get_json(force=True), bot)
    # Update dispatcher process that handler to process this message
    dispatcher.process_update(update)
return 'ok'New a dispatcher for bot
dispatcher = Dispatcher(bot, None)Add handler for handling message, there are many kinds of message. For this handler, it particular handle text
message.
dispatcher.addhandler(MessageHandler(Filters.text, replyhandler))if name == "main": # Running server app.run(debug=True)
完成後,就可以用
pipenv running。在專案目錄中執行以下命令$ pipenv run python3 main.py* Serving Flask app "main" (lazy loading)
* Environment: production
WARNING: Do not use the development server in a production environment.
Use a production WSGI server instead.
* Debug mode: on
2018-06-15 16:38:07,843 - werkzeug - INFO - * Running on [http://127.0.0.1:5000/](http://127.0.0.1:5000/) (Press CTRL+C to quit)
2018-06-15 16:38:07,845 - werkzeug - INFO - * Restarting with stat
2018-06-15 16:38:08,279 - werkzeug - WARNING - * Debugger is active!
2018-06-15 16:38:08,324 - werkzeug - INFO - * Debugger PIN: 244-087-163此時就可以用 ngrok 服務,它會幫我們在 cloud 建立 public domain 對 local 端的 poxy。執行以下命令
$ ngrok http 50005000 剛好對應 Flask App listening 的 port
Session Status                online
Session Expires               7 hours, 58 minutes
Version                       2.2.8
Region                        United States (us)
Web Interface                 [http://127.0.0.1:4040](http://127.0.0.1:4040)
Forwarding                    [http://76f2a29d.ngrok.io](http://76f2a29d.ngrok.io) -> localhost:5000
Forwarding                    [https://76f2a29d.ngrok.io](https://76f2a29d.ngrok.io) -> localhost:5000

Connections                   ttl     opn     rt1     rt5     p50     p90
2 0 0.03 0.01 1.21 1.89請注意,ngrok 只有在 development 使用,production 環境還是會將程式部署到正式的 service設定 Telegram Bot webhook 的方法可參考文件,透過瀏覽器進入以下連結
https://api.telegram.org/bot{$token}/setWebhook?url={$webhook_url}$token 和 $webhook_url 請換成在 Step 1 申請到的,例如:https://api.telegram.org/bot606248605:AAGv_TOJdNNMc_v3toHK_X6M-dev_1tG-JA/setWebhook?url=https://bcf4cd97.ngrok.io/hook{
ok: true,
result: true,
description: "Webhook was set"
}
到這邊為止的完整程式碼
Step 5. Add NLP feature for chatbot
嘗試過 Microsoft LUIS 及 Google Dialog Flow,它們都沒有預設的中文語音對話模組,都要自己提供語料自己 train。最後選擇用 OLAMI Open API,它是威盛電子旗下的智能語音互動平台,裡面的 IDS 模組只要 Chatbot 串接完就可以得到許多技能,包含聊天、問天氣、股市、音樂、百科、食譜、算數學。雖然 NLP 的作法是 Rule-based,但現階段是很成熟的 Solution。接下來教大家怎麼把 OLAMI Open API 整合進 Telegram Bot 中。先註冊 OLAMI 帳號,在 OLAMI 我的應用介面建立新應用,得到 App Key 及 App Secret,把它們填入專案目錄中的
config.ini 檔案[OLAMI]
APP_KEY = your_app_key
APP_SECRET = your_app_secret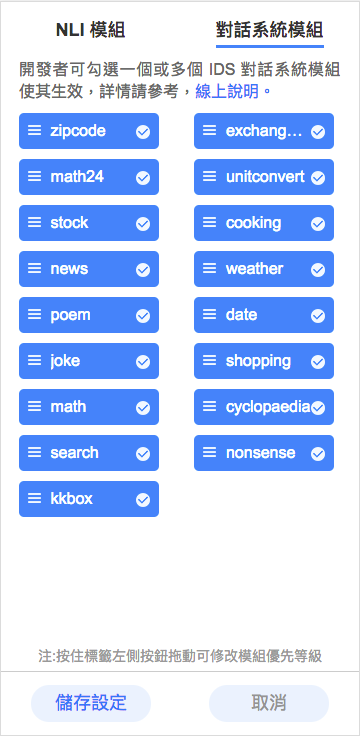
回到專案目錄,新增資料夾,名字叫做 nlp
$ mkdir nlp__init__.py 及 olami.py$ cd nlp
$ touch __init__.py
$ touch olami.pyProject Directory
├── nlp
| ├── __init__.py
| └── olami.py
├── config.ini
├── main.py
├── Pipfile
└── Pipfile.lock__init__.py 是為了讓 main.py import nlp 的時候認定 nlp 是一個 Module。編輯
nlp/__init__.pypython
from . import olami
編輯
olami.pyimport requests
Load data from config.ini file
config = configparser.ConfigParser() config.read('config.ini')logger = logging.getLogger(name)
class NliStatusError(Exception): """The NLI result status is not 'ok'"""
class Olami: URL = 'https://tw.olami.ai/cloudservice/api'
def __init__(self, app_key=config['OLAMI']['APP_KEY'], app_secret=config['OLAMI']['APP_SECRET'], input_type=1):
    self.app_key = app_key
    self.app_secret = app_secret
    self.input_type = input_type

def nli(self, text, cusid=None):
    response = requests.post(self.URL, params=self._gen_parameters('nli', text, cusid))
    response.raise_for_status()
    response_json = response.json()
    if response_json['status'] != 'ok':
        raise NliStatusError(
            "NLI responded status != 'ok': {}".format(response_json['status']))
    else:
        return response_json['data']['nli'][0]['desc_obj']['result']

def _gen_parameters(self, api, text, cusid):
    timestamp_ms = (int(time.time() * 1000))
    params = {'appkey': self.app_key,
              'api': api,
              'timestamp': timestamp_ms,
              'sign': self._gen_sign(api, timestamp_ms),
              'rq': self._gen_rq(text)}
    if cusid is not None:
        params.update(cusid=cusid)
    return params

def _gen_sign(self, api, timestamp_ms):
    data = self.app_secret + 'api=' + api + 'appkey=' + self.app_key + \
           'timestamp=' + str(timestamp_ms) + self.app_secret
    return md5(data.encode('ascii')).hexdigest()

def _gen_rq(self, text):
    obj = {'data_type': 'stt', 'data': {'input_type': self.input_type, 'text': text}}
return json.dumps(obj)olami.py 主要在實作 request OLAMI NLI API 的 method。request OLAMI NLI API 時需要利用 App Key 及 App Secret 生成一組 sign,放入 url parameter 才能通過 OLAMI API Server 的驗證。sign 生成方法 Document完成後,回到專案目錄,編輯
OLAMI NLI API Document
main.py,import nlp module,並將原來 reply_handler method 中直接回傳使用者訊息的邏輯,改為先將使用者訊息傳給 OLAMI NLI API,再把結果回傳給使用者。def replyhandler(bot, update): """Reply message.""" text = update.message.text - text = update.message.text - update.message.replytext(text) + reply = Olami().nli(text) + update.message.reply_text(reply)
修改後的完整
main.pyimport telegram from flask import Flask, request from telegram.ext import Dispatcher, MessageHandler, Filters
from nlp.olami import Olami
Load data from config.ini file
config = configparser.ConfigParser() config.read('config.ini')Enable logging
logging.basicConfig(format='%(asctime)s - %(name)s - %(levelname)s - %(message)s', level=logging.INFO) logger = logging.getLogger(name)Initial Flask app
app = Flask(name)Initial bot by Telegram access token
bot = telegram.Bot(token=(config['TELEGRAM']['ACCESS_TOKEN']))@app.route('/hook', methods=['POST']) def webhookhandler(): """Set route /hook with POST method will trigger this method.""" if request.method == "POST": update = telegram.Update.dejson(request.get_json(force=True), bot)
    # Update dispatcher process that handler to process this message
    dispatcher.process_update(update)
return 'ok'New a dispatcher for bot
dispatcher = Dispatcher(bot, None)Add handler for handling message, there are many kinds of message. For this handler, it particular handle text
message.
dispatcher.addhandler(MessageHandler(Filters.text, replyhandler))if name == "main": # Running server app.run(debug=True)
對 Telegram Bot 進行測試,它已經可以回應詢問天氣、算數、股價等問題。
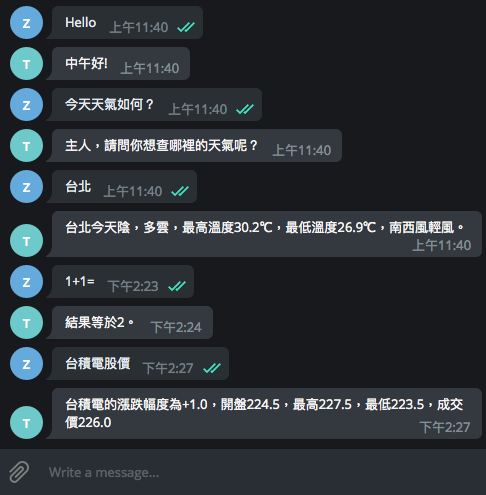
但有些問題的回答有點奇怪,似乎只回覆片段訊息,為什麼會這樣呢?
原來 OLAMI 不同的 IDS 對話模組回傳的 Data Structure 不一樣(參考說明文件)我們需要根據不同 Intent 的訊息處理回傳內容。
Step 6. Intent detection
Intent detection 是 Chatbot 的重要核心,從使用者的訊息判斷他的意圖與期望獲得的資訊。若意圖不夠明確,Chatbot 可以藉由更進一步的問題抽絲剝繭出使用者明確的需求。例如:使用者:「今天天氣如何?」
Chatbot:「請問您詢問的是哪裡的天氣?」
使用者:「台北」
Chatbot:「台北今天陰,多雲,最高溫度 30.2℃,最低溫度 26.9℃,南西風輕風。」
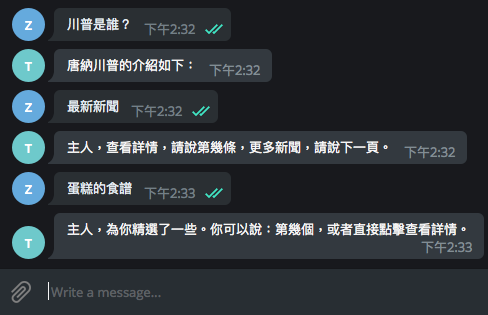
使用者:「告訴我今日新聞」
Chatbot:「以下幾則新聞,請問您想知道哪一則的詳細內容?
- 27 歲被酸「一把年紀還沒人愛」!Kiwebaby 聽到卻笑了
- 鍾文榮/拼經濟靠女性 口紅是最後買的起的奢侈品?
- 李沃牆/美中貿易戰劍拔弩張 新興市場股匯失血崩跌
- 損失 350 億!南韓最大虛擬貨幣平台 Bithumb 遭駭 全面中斷交易
- 侯友宜文大宿舍爭議 段宜康:該由政風啟動調查的是新北市府」
Chatbot:「南韓虛擬貨幣交易所 Bithumb 於 20 日爆出駭客入侵消息,市值350 億韓元(約新台幣 95.3 億元)的虛擬貨幣遭竊。這是南韓 2018 年以來發生的第 2 起虛擬貨幣平台駭客事件,韓國網路振興院(KISA)稍早已經獲報並著手調查。」
幸好這些 OLAMI 的 IDS 對話模組都有 handle!程式只要處理不同模組回傳的 Data Structure 即可。
編輯
nlp/olami.py,新增 intent_detection method,原本程式是將 OLAMI NLI API response 的結果取 result 的值回傳(第 10 行);改成先判斷 Intent 的 type(第 28 及 32~40 行),再根據 type 取不同的值做回傳。python
class Olami:
def nli(self, text, cusid=None):
response = requests.post(self.URL, params=self._gen_parameters('nli', text, cusid))
response.raise_for_status()
response_json = response.json()
if response_json['status'] != 'ok':
raise NliStatusError(
"NLI responded status != 'ok': {}".format(response_json['status']))
else:
- return response_json['data']['nli'][0]['desc_obj']['result']
+ nli_obj = response_json['data']['nli'][0]
+ return self.intent_detection(nli_obj)
+
+ def intent_detection(self, nli_obj):
+ def handle_selection_type(type):
+ reply = {
+ 'news': lambda: desc['result'] + '\n\n' + '\n'.join(
+ str(index + 1) + '. ' + el['title'] for index, el in enumerate(data)),
+ 'poem': lambda: desc['result'] + '\n\n' + '\n'.join(
+ str(index + 1) + '. ' + el['poem_name'] + ',作者:' + el['author'] for index, el in
+ enumerate(data)),
+ 'cooking': lambda: desc['result'] + '\n\n' + '\n'.join(
+ str(index + 1) + '. ' + el['name'] for index, el in
+ enumerate(data))
+ }.get(type, lambda: '對不起,你說的我還不懂,能換個說法嗎?')()
+ return reply
+
+ type = nli_obj['type']
+ desc = nli_obj['desc_obj']
+ data = nli_obj.get('data_obj', [])
+
+ reply = {
+ 'kkbox': lambda: data[0]['url'] if len(data) > 0 else desc['result'],
+ 'baike': lambda: data[0]['description'],
+ 'news': lambda: data[0]['detail'],
+ 'joke': lambda: data[0]['content'],
+ 'cooking': lambda: data[0]['content'],
+ 'selection': lambda: handle_selection_type(desc['type']),
+ 'ds': lambda: desc['result'] + '\n請用 /help 指令看看我能怎麼幫助您'
+ }.get(type, lambda: desc['result'])()
+
+ return reply
修改後的完整 olami.py
import requests
config = configparser.ConfigParser() config.read('config.ini')
logger = logging.getLogger(name)
class NliStatusError(Exception): """The NLI result status is not 'ok'"""
class Olami: URL = 'https://tw.olami.ai/cloudservice/api'
def __init__(self, app_key=config['OLAMI']['APP_KEY'], app_secret=config['OLAMI']['APP_SECRET'], input_type=1):
    self.app_key = app_key
    self.app_secret = app_secret
    self.input_type = input_type

def nli(self, text, cusid=None):
    response = requests.post(self.URL, params=self._gen_parameters('nli', text, cusid))
    response.raise_for_status()
    response_json = response.json()
    if response_json['status'] != 'ok':
        raise NliStatusError(
            "NLI responded status != 'ok': {}".format(response_json['status']))
    else:
        nli_obj = response_json['data']['nli'][0]
        return self.intent_detection(nli_obj)

def _gen_parameters(self, api, text, cusid):
    timestamp_ms = (int(time.time() * 1000))
    params = {'appkey': self.app_key,
              'api': api,
              'timestamp': timestamp_ms,
              'sign': self._gen_sign(api, timestamp_ms),
              'rq': self._gen_rq(text)}
    if cusid is not None:
        params.update(cusid=cusid)
    return params

def _gen_sign(self, api, timestamp_ms):
    data = self.app_secret + 'api=' + api + 'appkey=' + self.app_key + \
           'timestamp=' + str(timestamp_ms) + self.app_secret
    return md5(data.encode('ascii')).hexdigest()

def _gen_rq(self, text):
    obj = {'data_type': 'stt', 'data': {'input_type': self.input_type, 'text': text}}
    return json.dumps(obj)

def intent_detection(self, nli_obj):
    def handle_selection_type(type):
        reply = {
            'news': lambda: desc['result'] + '\n\n' + '\n'.join(
                str(index + 1) + '. ' + el['title'] for index, el in enumerate(data)),
            'poem': lambda: desc['result'] + '\n\n' + '\n'.join(
                str(index + 1) + '. ' + el['poem_name'] + ',作者:' + el['author'] for index, el in
                enumerate(data)),
            'cooking': lambda: desc['result'] + '\n\n' + '\n'.join(
                str(index + 1) + '. ' + el['name'] for index, el in
                enumerate(data))
        }.get(type, lambda: '對不起,你說的我還不懂,能換個說法嗎?')()
        return reply

    type = nli_obj['type']
    desc = nli_obj['desc_obj']
    data = nli_obj.get('data_obj', [])

    reply = {
        'kkbox': lambda: data[0]['url'] if len(data) > 0 else desc['result'],
        'baike': lambda: data[0]['description'],
        'news': lambda: data[0]['detail'],
        'joke': lambda: data[0]['content'],
        'cooking': lambda: data[0]['content'],
        'selection': lambda: handle_selection_type(desc['type']),
        'ds': lambda: desc['result'] + '\n請用 /help 指令看看我能怎麼幫助您'
    }.get(type, lambda: desc['result'])()

return reply再一次測試 Telegram Bot
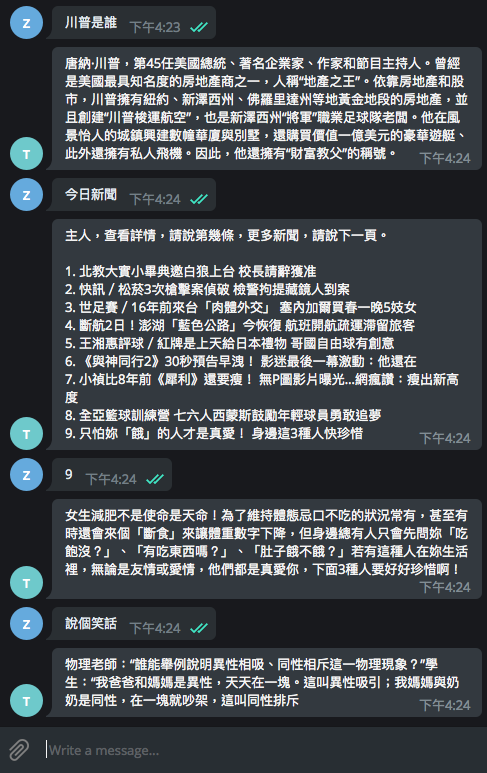
現在,Telegram Bot 可以查人物、說笑話、甚至連多段式對話(選擇有興趣的新聞)都可以做出回應了。
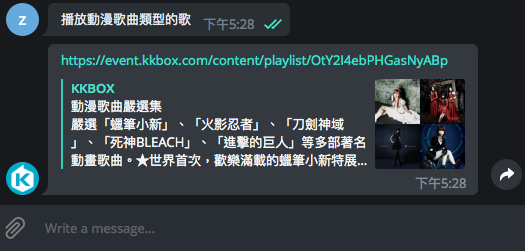
範例是將所有 OLAMI IDS 對話模組全部實作,你也可以只實作需要的模組。但如果想要的對話功能 OLAMI IDS 對話模組沒有怎麼辦?例如我希望 Chatbot 幫我找動漫歌曲
下一篇文章再跟大家介紹如何為 Chatbot 添加新技能。
範例完整程式碼
如果想要把現階段的 Chatbot 部署上 production 環境,步驟可以參考下一篇文章的 Step. 9 Deployment
留言